Monday, November 4, 2019

2019 Christmas Advent Calendar Chest


Hello, Friends!

I have a new Design Team Project to share with you that I made for Country Craft Creations. This will be my new Advent Calendar for 2019. Tammy had these premade Matchbook boxes in the store but they are all sold out. They are lightweight chipboard and that helps with its sturdy construction.


Tammy’s video tutorial of this Advent Calendar Chest is available on YouTube. She shows you how to create your box topper with 3D elements to create a Christmas/Winter scene. I decided to create my Box top with an Easel card. The card is on a spinner so I can have it facing the days of the month we retrieve the treat from the drawer.


I've posted a preview of the box and a quick tutorial of how to create a spinner for your scene on the top of the box.

I would love it if you subscribe to my channel and click on the Bell for notifications when I post new videos. I am almost up to 1000 subscribers so once I meet that number I will be hosting a giveaway as a “Thank you” for subscribing and allowing me to share my creativity with you all.

Just to pique your interest I have new products arriving from Country Craft Creations for our November Craftology Box and I will be sharing some new cards and tutorials in the coming weeks. Hope to see you soon.

Thanks for popping in to visit and have a great day…

Hugz,


Tuesday, October 29, 2019

Mixed Media Christmas Cards


Hello, Friends!

I haven’t posted in a long time because I’ve actually been Vlogging more often. But I made several Christmas cards over the past couple weeks so I thought I would share them with you and rejuvenate my blog posts.

These are cards I made as part of my Design Team responsibilities for Country Craft Creations. I love this store and the owner, Tammy Merrill, is one of the most inspiring crafters on the planet. She provides weekly free tutorials on Facebook and I encourage you to check out the projects there. Just search for "Scrapbookers of Country Craft Creations" on FB and click JOIN. There is something for just about anyone. You can also find Tammy on YouTubeThe mini-albums have become one of my passions to create but I still love making my cards.


Here is a preview of these cards as well as tutorials on my YouTube channel with some of the mixed media products, paper collections, tools and techniques I used to make them. I also share the inside design of my cards in these videos.


This video is Part 1


 This is Part 2


I would love it if you subscribe to my channel. I am almost up to 1000 subscribers, so once I meet that number I will be hosting a giveaway as a “Thank you” for subscribing and allowing me to share my creativity with you all.

Thanks for popping in to visit and have a great day…

Hugz,


Wednesday, January 24, 2018

January Craftology Box Projects

Hello, Friends!

I hope your January is treating you well. Today I have several projects to share with you that I made with the January Craftology Box from Country Craft Creations.

For a full product review, you can go to Kimmy Murray’s video blog for all the details here.

The paper collection is from Authentique called Dame. The vintage collage imagery is so shabby chic and I love the Paris theme.

The first card I made uses a 3 x 4 cut-apart as my motif with paper from the 12 x 12 and 6 x 6 paper collections.


The “CHIC” banner was made from the Authentique components die cut sheet that came with the kit and I used some Prima flowers from Country Craft Creations for the card.


Next up is a 5 x 7 card that I made using some of the 28 Lilac Lane beads and sequins included in the kit to make a shaker card. The focal point of the shaker card is a 3 x 4 cut-apart and I added some pretty teal ribbon from my stash with a Prima flower from the store. The “Friendship” sentiment is a sticker from the “Dame” sticker sheet.


Here’s the inside with another 3 x 4 cut-apart and a Prima flower that I made with some beads from 28 Lilac Lane, So Shiny sequin and bead collection.


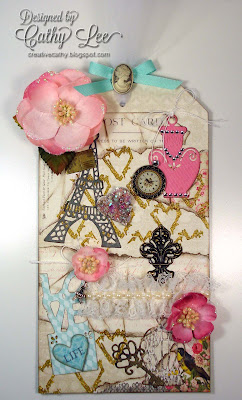
For my last project, I used the Chipboard tag that came with the kit to make a shabby chic collage tag.


This tag is all about Paris. I added some metal elements and charms from my stash and created lots of texture with torn and distressed papers from the Dame collection. I even used a bunch of the sequin elements to make a loaded heart shaped embellishment. The flowers are Petaloo from Tammy's store and I used a lot of my Magnolia Oo-La-La dies that have a Paris/Love theme.

I also used some BoBunny gold glitter paste with one of my TWC stencils to create the gold hearts in the background. It gives this tag lots of texture. I also used some BoBunny Brass shimmer spray for some of the brass elements on the tag.

I hope I inspired you with this fabulous Craftology Box. I'll be back with several new projects using the February Craftology Box very soon.

Thanks for popping in to visit and have a great day…


Hugz,

Sunday, November 12, 2017

November Craftology Box Projects


Hello, Friends!
I’ve been away for a little while…but I’m here today to share my Country Craft Creations, Creative Design Team cards and projects.

First up are my November Craftology Box cards that I made using the Simple Stories “Very Merry” paper collection.


This card I call “Baby it’s Cold Outside.” The sentiment is a cut-apart from the paper collection and the background is from the 6 x 8 paper pad. I fussy cut the snowman from a cut-apart and popped him up on fun foam. I created a broom with some rolled Kraft paper that I fringe cut; the broomstick is an ink distressed Q-tip with the ends snipped off.


Here is the inside of the card. I glued the sentiment on the left side so that I could use the right to create a message for the recipient. I gave a few snowflakes a coat of Glamour Dust and attached them to my sentiment.


This card is “Here Comes Santa Claus.” I started with a specialty card base that was part of the kit. I used the cut-apart for my sentiment and I added a poinsettia flower that I made with my Magnolia dies. The paper bow was constructed with my envelope punch board.


Here’s the inside of the card. The evergreen tree frame is an Echo Park die and I used some white acrylic paint to give the evergreen boughs some snow effects then I covered the paint with stardust stickles once it was dry. I cut out a cute truck from the set of stickers in the kit and popped it up with fun foam. The sentiment is also a sticker from the collection.


My third card, “Peace on Earth,” was crafted with another specialty card base. I inked all my paper panels and the card base with Brushed Corduroy Distress Ink. The poinsettia was created with a Spellbinders die and the little pinecone accent on my bow is a chipboard element from the collection with a rhinestone brad in the middle. I also created a magnetic closure for this card.


The sentiment on the inside of my card is a cut-apart from the collection. I fussy cut a flower with pinecone image from the paper and attached it with fun foam for dimension.   


For the last card, “Winter Wonderland,” I used the Evergreen tree frame die again with a cut-apart that I modified to allow the sentiment to show through the frame. I sprinkled some extra thick embossing powder on my plaid background paper and heated the powder under the paper to create a snow effect. I added some white seam binding with a square knot and attached the pearl snowflakes that came with the kit to the front of my card.


The inside of my card has a cute peppermint hot cocoa cut-apart image with a sticker sentiment that I attached with fun foam.


My last project I created with the Craftology Box kit is a cute "Merry Christmas 12 x 12 Layout" scrapbook page. The background pattern paper was perfect for this design. I created my poinsettia with a Tim Holtz Sizzix die and embossing combo. Tamra carries this die in the store. I love the texture it gives my layout. The ribbon is also part of the kit and the “Merry Christmas” title is a large chipboard piece from the collection. I also adhered several rhinestones from my stash about the page for a bit of glitz.

I hope you enjoyed my cards and projects. For the tutorials stop by my YouTube Channel and I would love it if you would subscribe so you don’t miss out on new videos in the future. Also be sure to join us on our Facebook page. This crafter's community is fabulous for tutorials and inspiration.

Thanks for popping in to visit and have a great day…

Hugz,

Sunday, October 22, 2017

Country Craft Creations - Christmas Tags


Hello, Friends!
I have a new Design Team project to share with you for…


Country Craft Creations!


I made a set of 3 Christmas tags from Carta Bella’s “A Very Merry Christmas” collection by Steven Duncan. Here are a few photos along with a video preview at my YouTube channel with product details.


Thanks for popping in to visit and have a great day…

Hugz,

Saturday, October 7, 2017

Exciting News and New Cards


Hello, Friends! I know I’ve been missing in action for a couple months but now I am back and I have some FABULOUS news to share with you!

I have been invited to join the Creative Design Team for


WooHoo!!!

I am so excited because as part of my design team duties I will be video blogging with new product reveals, tutorials and sharing my creative inspiration.

I am also part of the Craftology Design Team and I’ll be focusing on card making with the monthly Craftology Box. October Box is gone but you can order November and there are several kit options from which to choose. 

Tammy Merrill is one of the most gracious store owners I’ve ever had the pleasure to design for and she has so many paper collections, embellishments, tools and galore in the store. She is herself a talented and inspiring crafter sharing her creations through her tutorials and live streams on Facebook and YouTube.

The October Craftology Box includes the entire collection of 12 x 12 designer papers from Echo Park’s “A Perfect Autumn” by Lori Whitlock. I love Lori’s work and this one is exceptionally adorable with the cute critters and fun artistry in the papers. The Craftology Box has some fabulous elements that accompany this collection. There are designer brads, paper bows, canvas ribbon, the 12 x 12 Sticker sheet, a couple adorable gold and chocolate colored glitter jingle bells and fall leaf/acorn/pumpkin sequins. The add-ons include the Ephemera frames & tags as well as the die cut cardstock pieces, Layered Stickers, Dies, chipboard pieces, Enamel words & Phrases and the 6 x 6 paper pad. And there's even Bobunny Copper and Chocolate glitter paste in the mix.


My first card is a whimsical romantic card using a cut-a-part from the 12 x 12 papers and fussy cut art and ribbon to create dimension and texture. A short tutorial for this card is HERE.


My second card is a Fall Blessings card with a clean and simple style using the autumn sequins as a wreath for the focal point. The YouTube tutorial for this one is HERE.


The third card is distressed and grungy with some handmade flowers that have been distressed with inks and sprays for a mixed media flare. I also added the pretty fall bells to this one.


My fourth card is what I would call a traditional scrapbook card. It has die cuts of pumpkins with the various designer papers and some burlap for texture that screams autumn.


The fifth card is a Tri-shutter card design that creates interactive movement and showcases some of the gorgeous designer papers.

I hope you enjoy the YouTube tutorials and reviews. Please subscribe to my channel. I look forward to sharing my new crafty projects. I have mini albums and 3D creations in the works. 

Until next time, enjoy and I hope your creativity never ends. Thanks for popping in to visit and have a great day…


Hugz,

Wednesday, August 9, 2017

Magnolia-licious Inspiration - Rowan Fairy


Hello, Friends!

Today I’m sharing a new inspirational card for Magnolia-licious. Sadly, this will be my last DT post for Magnolia-licious. Shawn and Candy have been so generous and wonderful to work with. I wish them all the best.


My card features an adorable Wee Stamp called Rowan Fairy by Sylvia Zet. I used a few Summertime papers from Maja Designs for my card cut with Go Kreate dies. I layered my designer paper panels with fun foam for lots of dimension.


I kept the card fairly simple by adding some lace, cheese cloth, pearl trim, flowers and a double bow.


Here’s a close up of my fairy colored with Copics.

I will be back with some fabulous news in the coming week. I am so excited to take my crafting to the next level and I can’t wait to share my news.

Thanks for stopping by today. Have a great week.


Hugz,

Related Posts Plugin for WordPress, Blogger...